Hello Kitty Cake
Hello Kitty is adored by millions of people around the world and great for all ages. A Hello Kitty cake would be a great addition to your event. Become inspired by one of these amazing cakes with lots of fun pink and white colors. Click on a cake below to learn more:
|
Hello Kitty Cake |
Hello Kitty Cake |
|
Hello Kitty Cake | |
|
Hello Kitty Cake |
Hello Kitty Cake |
Hello Kitty Cake
"This is the cutest Hello Kitty Cake ever! Thanks!"
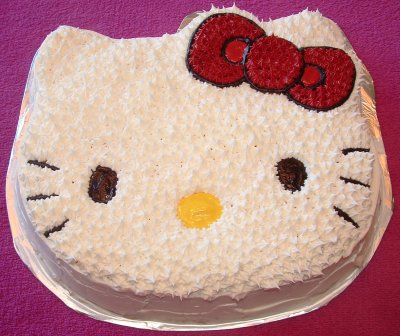 |
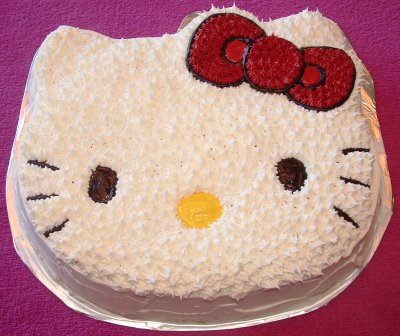
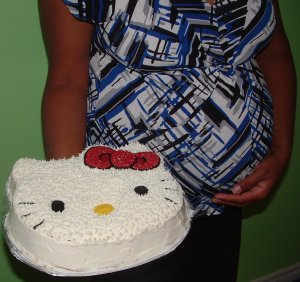
I am so excited about having a new niece. So to help encourage her to be born I made her mother a cake and thought it would be a cute idea. I figured that this would be the ultimate birthday cake and also thought that her mother would enjoy eating the cake before she was born. I used the Hello Kitty Cake pan and a store bought cake mix. The cake cooked well, but needed a little extra time in the oven than was stated on the pan (so test with a toothpick). |
|
It was a quick cake to ice if you use the right tips. The colors needed are black (whiskers, eyes, and outline of the bow), yellow (nose) and white for the rest of the Kitty. I used tip #789 to ice the outside of the cake. This tip made the icing of the outside so quick I would recommend this tip to anyone who ices cakes often. I used tip #3 for all my outlining and tip #16 for the bow. Another trick that is fantastic to smooth out the eyes, nose and part of the bow I mixed cornstarch with a bit of water and it instantly smoothes out the areas (push with your finger). I tried a new tip for the hair part of the hello kitty cake. I tried tip # 2010, it makes 3 star shapes at the same time. This really sped up the process. I thought the look was a little sloppier (I am used to the smaller star shapes), but looked more like the hair so it worked. For any gaps in the hair I filled in with tip #18 (the same size star shape as the tip #2010). I think the cake looks just like Hello Kitty. I am hopeful that this Kitty cake will help encourage my new niece to arrive. |
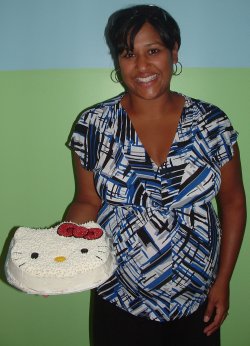  |

I am so excited about having a new niece. So to help encourage her to be born I made her mother a cake. I figured that this would be the ultimate birthday cake and also thought that her mother would enjoy eating the cake before she was born. I thought that it would be a cute idea.
I used the Hello Kitty Cake pan and a store bought cake mix. The cake cooked well, but needed a little extra time in the oven than was stated on the pan (so test with a toothpick).
It was a quick cake to ice if you use the right tips. The colors needed are black (whiskers, eyes, and outline of the bow), yellow (nose) and white for the rest of the Kitty. I used tip #789 to ice the outside of the cake. This tip made the icing of the outside so quick I would recommend this tip to anyone who ices cakes often. I used tip #3 for all my outlining and tip #16 for the bow. Another trick that is fantastic to smooth out the eyes, nose and part of the bow I mixed cornstarch with a bit of water and it instantly smoothes out the areas (push with your finger). I tried a new tip for the hair part of the hello kitty cake. I tried tip # 2010, it makes 3 star shapes at the same time. This really sped up the process. I thought the look was a little sloppier (I am used to the smaller star shapes), but looked more like the hair so it worked. For any gaps in the hair I filled in with tip #18 (the same size star shape as the tip #2010).
I think the cake looks just like Hello Kitty. I am hopeful that this Kitty cake will help encourage my new niece to arrive.


Hello Kitty Cake 2
 By: Marissa (San Diego, CA) |
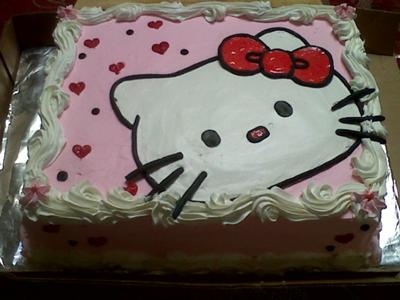
This cake was designed by Marissa for their friend’s niece's birthday party. The light pink background and smooth Hello Kitty face would have been a great addition to the little ones' event, enjoyed by all the guests. To make this thin double layer cake, start by baking two 16 x 24 inch vanilla or red velvet cakes. Then, once cooled, stack the cakes with a thin layer of vanilla icing in the middle. For the pastel pink icing, slowly add a few drops of Wilton pink food coloring to vanilla icing, only 2-3 drops at a time to not overpower the color. Apply a thick enough layer to the cake to get a solid color when smoothing it out with an icing spatula. |
For the large Hello Kitty cake head, use royal icing, starting with a black outline. Next, fill in the middle with white, using a scribbler needle to smooth it out. Then, fill in the bow with bright red to constraint against the pink background, smoothing it out. After it is solid, add the finishing touches of the eyes and nose. Likewise, add black licorice as whiskers and small hearts in the background. Finally, around the top and bottom of the cake, pipe swirls using a star tip and buttercream frosting.
Enjoy your delicious Hello Kitty cake.
By: Marissa (San Diego, CA)

This cake was designed by Marissa for their friend’s niece's birthday party. The light pink background and smooth Hello Kitty face would have been a great addition to the little ones' event, enjoyed by all the guests.
To make this thin double layer cake, start by baking two 16 x 24 inch vanilla or red velvet cakes. Then, once cooled, stack the cakes with a thin layer of vanilla icing in the middle. For the pastel pink icing, slowly add a few drops of Wilton pink food coloring to vanilla icing, only 2-3 drops at a time to not overpower the color. Apply a thick enough layer to the cake to get a solid color when smoothing it out with an icing spatula.
For the large Hello Kitty cake head, use royal icing, starting with a black outline. Next, fill in the middle with white, using a scribbler needle to smooth it out. Then, fill in the bow with bright red to constraint against the pink background, smoothing it out. After it is solid, add the finishing touches of the eyes and nose. Likewise, add black licorice as whiskers and small hearts in the background. Finally, around the top and bottom of the cake, pipe swirls using a star tip and buttercream frosting.
Enjoy your delicious Hello Kitty cake.
Hello Kitty Cake 3
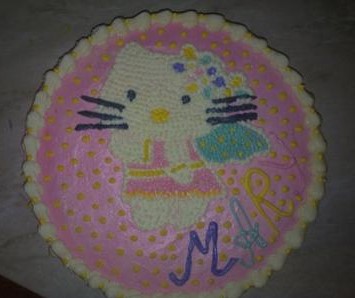
This Hello Kitty cake was designed by Gohar for Mary. Baking and decorating a cake is always a nice gesture, especially when it has strawberries…delicious.
|
To make this cake, begin by baking two standard 9 inch cakes, filling the pans about halfway. Use a cake leveler to cut off the top of both cakes to make sure they are level for balancing. Place the first cake on a rotating cake turntable and add a thin layer of strawberry buttercream. Then, cut strawberries lengthwise to get thin pieces and place them in a circular pattern starting from the middle and spiraling outwards. After placing the strawberries, place the second cake on top. Using an icing spatula, create a smooth layer of strawberry buttercream around the top and sides of the cake. To decorate the cake, start by using a toothpick to sketch out your Hello Kitty figure on the cake. Using white, pink, yellow, teal, purple, and black icing with a star tip (#362), pipe out your figure along the stretch outline. To get the starts effect, squeeze the piping bag at a 90 degree angle, lifting straight up and down. Once the Hello Kitty is done, use a Wilton #2 small circle tip, pipe a line pattern around the sides and a #20 tip to make swirls around the top. Next, using the #362 again, pipe little yellow stars around the cake. Finally, if you wish add the touch of a name of message using the #2 piping tip. Enjoy your adorable memorable Hello Kitty cake. |
 By: Gohar (Russia, Moscow) 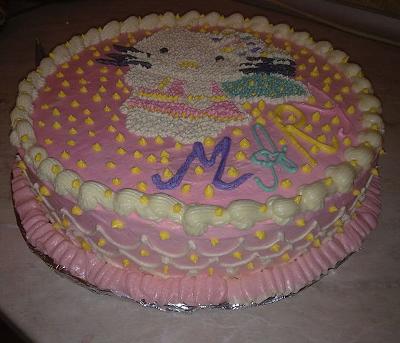 |
By: Gohar (Russia, Moscow)
This Hello Kitty cake was designed by Gohar for Mary. Baking and decorating a cake is always a nice gesture, especially when it has strawberries…delicious.


To make this cake, begin by baking two standard 9 inch cakes, filling the pans about halfway. Use a cake leveler to cut off the top of both cakes to make sure they are level for balancing. Place the first cake on a rotating cake turntable and add a thin layer of strawberry buttercream. Then, cut strawberries lengthwise to get thin pieces and place them in a circular pattern starting from the middle and spiraling outwards. After placing the strawberries, place the second cake on top. Using an icing spatula, create a smooth layer of strawberry buttercream around the top and sides of the cake.
To decorate the cake, start by using a toothpick to sketch out your Hello Kitty figure on the cake. Using white, pink, yellow, teal, purple, and black icing with a star tip (#362), pipe out your figure along the stretch outline. To get the starts effect, squeeze the piping bag at a 90 degree angle, lifting straight up and down. Once the Hello Kitty is done, use a Wilton #2 small circle tip, pipe a line pattern around the sides and a #20 tip to make swirls around the top. Next, using the #362 again, pipe little yellow stars around the cake. Finally, if you wish add the touch of a name of message using the #2 piping tip.
Enjoy your adorable memorable Hello Kitty cake.
Hello Kitty Cake 4
 By: Bonnie (Spring, TX) |
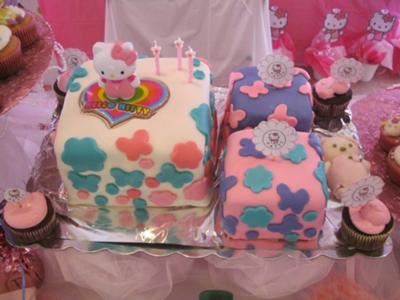
This beautiful homemade fondant cake was created by Bonnie for her daughter’s 3’rd birthday party. She made everything herself and personalized all the decorations for the Hello Kitty birthday party. Bonnie worked so hard for about two and a half months to organize everything, including this lovely Hello Kitty Cake. This beautiful homemade fondant cake was created by Bonnie for her daughter’s 3’rd birthday party. She made everything herself and personalized all the decorations for the Hello Kitty birthday party. Bonnie worked so hard for about two and a half months to organize everything, including this lovely Hello Kitty Cake. |
To make these triple decker cakes, bake three 9 inch circle cakes, and six 6 inch cakes. Once cooled, layer the cakes with a thin layer of vanilla buttercream between each layer. Roll out a large piece of white fondant and place it over the large cake and gently smooth it out. Then, roll out a large piece of pink and purple for each of the smaller cakes. Next roll out pieces of pink, purple, and blue and use a cookie cutter to cut out fun flower shapes. Then, using a little bit of water as an adhesive, gently press the decorations onto the cakes. Finally, add a Hello Kitty action figure on top and enjoy.
By: Bonnie (Spring, TX)

This beautiful homemade fondant cake was created by Bonnie for her daughter’s 3’rd birthday party. She made everything herself and personalized all the decorations for the Hello Kitty birthday party. Bonnie worked so hard for about two and a half months to organize everything, including this lovely Hello Kitty Cake.
This beautiful homemade fondant cake was created by Bonnie for her daughter’s 3’rd birthday party. She made everything herself and personalized all the decorations for the Hello Kitty birthday party. Bonnie worked so hard for about two and a half months to organize everything, including this lovely Hello Kitty Cake.
To make these triple decker cakes, bake three 9 inch circle cakes, and six 6 inch cakes. Once cooled, layer the cakes with a thin layer of vanilla buttercream between each layer. Roll out a large piece of white fondant and place it over the large cake and gently smooth it out. Then, roll out a large piece of pink and purple for each of the smaller cakes. Next roll out pieces of pink, purple, and blue and use a cookie cutter to cut out fun flower shapes. Then, using a little bit of water as an adhesive, gently press the decorations onto the cakes. Finally, add a Hello Kitty action figure on top and enjoy.
