Mickey Mouse Cake
|
Mickey Mouse is a classic and beloved Disney character and all of your guests will be thrilled to have a custom Mickey Mouse cake at the party. They may be so excited by these cake designs that they say “meeska, mooska, mickey mouse". We have two cake options for you to use as inspiration by using our simple tips and tricks. The Mickey Mouse Cake is a double layer yellow and chocolate with white, red, blue, black, and peach icing. The Mickey Mouse Clubhouse cake is a three-dimensional replica that uses vanilla cake with fondant, buttercream, and rice krispies. Click on a cake to learn more about how they were made. |
Mickey Mouse is a classic and beloved Disney character and all of your guests will be thrilled to have a custom Mickey Mouse cake at the party. They may be so excited by these cake designs that they say “meeska, mooska, mickey mouse". We have two cake options for you to use as inspiration by using our simple tips and tricks. The Mickey Mouse Cake is a double layer yellow and chocolate with white, red, blue, black, and peach icing. The Mickey Mouse Clubhouse cake is a three-dimensional replica that uses vanilla cake with fondant, buttercream, and rice krispies. Click on a cake to learn more about how they were made.
Mickey Mouse Cake
 |
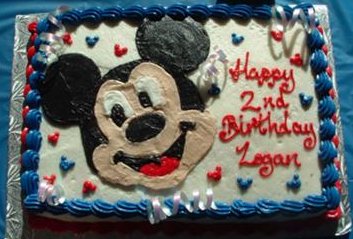
This cute Mickey Mouse Cake was submitted by Mike and was for his son’s second birthday party. The party was Mickey Mouse themed and matched the decorations, including the party colors of red, black, and blue. At a young age, kids can be indecisive, which led to the fun compromise of a two flavor yellow and chocolate cake. The cake was a hit and everyone thought it was delicious. |
To make this cake you will need to mix a bowl of yellow cake and a different bowl of chocolate cake. Fill two 9 inch cake pans about halfway full with each individual flavor. Bake the cakes for about 30 to 40 minutes or until fully cooked, so a toothpick will come out clean. Once out of the oven, place the cakes on a drying rack to cool. Then, use a cake leveler to cut the rounded top off of each cake.
Place the chocolate cake on the serving dish and place a thin layer of vanilla icing on top before placing the yellow layer on top. Then, apply a thick layer of vanilla icing over the entire cake using a bench scraper icing spatula to smooth out the icing to create a seamless appearance.
The next step of decorating this cake is to create the Mickey Mouse head. Begin by mixing up black, white, red, and peach colored icing. Then, use a toothpick to sketch out your pattern to have a general idea of where you will be piping the icing. Next, use a #4 Wilton piping tip to directly create the Mickey Mouse cake on your cake.
Using red icing and a #3 Wilton piping tip, write your happy birthday message. Then, using a #8 Wilton piping tip, ice small blue and red mickey heads on the top of the cake by creating three dots, one large and two small.
Finally, create a border around the top and bottom of the cake. Using an open star #13 Wilton tip pipe blue icing around the top and red icing around the bottom of the cake.
It is time to enjoy your delicious Mickey Mouse Cake.
This cute Mickey Mouse Cake was submitted by Mike and was for his son’s second birthday party. The party was Mickey Mouse themed and matched the decorations, including the party colors of red, black, and blue. At a young age, kids can be indecisive, which led to the fun compromise of a two flavor yellow and chocolate cake. The cake was a hit and everyone thought it was delicious.

To make this cake you will need to mix a bowl of yellow cake and a different bowl of chocolate cake. Fill two 9 inch cake pans about halfway full with each individual flavor. Bake the cakes for about 30 to 40 minutes or until fully cooked, so a toothpick will come out clean. Once out of the oven, place the cakes on a drying rack to cool. Then, use a cake leveler to cut the rounded top off of each cake.
Place the chocolate cake on the serving dish and place a thin layer of vanilla icing on top before placing the yellow layer on top. Then, apply a thick layer of vanilla icing over the entire cake using a bench scraper icing spatula to smooth out the icing to create a seamless appearance.
The next step of decorating this cake is to create the Mickey Mouse head. Begin by mixing up black, white, red, and peach colored icing. Then, use a toothpick to sketch out your pattern to have a general idea of where you will be piping the icing. Next, use a #4 Wilton piping tip to directly create the Mickey Mouse cake on your cake.
Using red icing and a #3 Wilton piping tip, write your happy birthday message. Then, using a #8 Wilton piping tip, ice small blue and red mickey heads on the top of the cake by creating three dots, one large and two small.
Finally, create a border around the top and bottom of the cake. Using an open star #13 Wilton tip pipe blue icing around the top and red icing around the bottom of the cake.
It is time to enjoy your delicious Mickey Mouse Cake.
Mickey Mouse Clubhouse Cake
 |
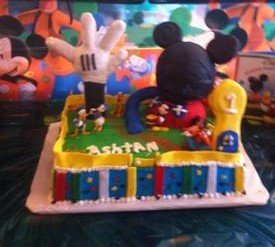
This Mickey Mouse Clubhouse party was submitted by Cindy Olano from Brusly, Louisiana. They used many cake techniques to create this cute cake that tied into their Mickey Mouse party theme. All the bright colorful decorations matched the young festive tone set by the cake. To make this cake, start by preheating the oven and mixing together yellow cake batter. Then, grease a 10 x 10 x 3 inch cake pan and place parchment paper in the bottom. As well, grease three halves of a Wilton ball pan. Pour the batter into the cake pans and bake for the desired time until fully cooked and when poked, a toothpick comes out clean. Place the cakes on a cooling rack and once cooled use a cake leveler to cut off the top of the square cake if uneven. |
Next apply a thin layer of vanilla icing to the square cake as a crumb coat before adding the fondant. Roll out large pieces of green and blue fondant. Place the green fondant on top of the game and blue fondant along the sides. Apply a crumb coat of icing to one of the round cake halves and apply a layer of red fondant then place the cake onto the square cake as the base to the clubhouse.
On both of the remaining round cake halves apply a thin crumb coat icing layer and then press together to make a ball. Next, cover the cake sphere with black fondant. Score and dap water on part of the clubhouse base and cake ball to attach on top of the main cake.
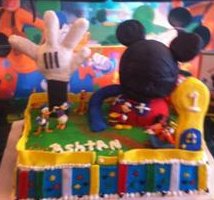
For the remaining figures of the cake, including the ears, characters, hand and fingers, slide, and foot door are created by shaping and wrapping colored fondant around rice krispies. Even the polka dots and strips along the side of the cake are pieces of cutout fondant. After adding these final decorations, roll out yellow fondant for the fence around the outside of the cake.
Congratulations on creating a detailed Mickey Mouse clubhouse cake and it is time to enjoy all of your hard work.
This Mickey Mouse Clubhouse party was submitted by Cindy Olano from Brusly, Louisiana. They used many cake techniques to create this cute cake that tied into their Mickey Mouse party theme. All the bright colorful decorations matched the young festive tone set by the cake.

To make this cake, start by preheating the oven and mixing together yellow cake batter. Then, grease a 10 x 10 x 3 inch cake pan and place parchment paper in the bottom. As well, grease three halves of a Wilton ball pan. Pour the batter into the cake pans and bake for the desired time until fully cooked and when poked, a toothpick comes out clean. Place the cakes on a cooling rack and once cooled use a cake leveler to cut off the top of the square cake if uneven.
Next apply a thin layer of vanilla icing to the square cake as a crumb coat before adding the fondant. Roll out large pieces of green and blue fondant. Place the green fondant on top of the game and blue fondant along the sides. Apply a crumb coat of icing to one of the round cake halves and apply a layer of red fondant then place the cake onto the square cake as the base to the clubhouse.
On both of the remaining round cake halves apply a thin crumb coat icing layer and then press together to make a ball. Next, cover the cake sphere with black fondant. Score and dap water on part of the clubhouse base and cake ball to attach on top of the main cake.
For the remaining figures of the cake, including the ears, characters, hand and fingers, slide, and foot door are created by shaping and wrapping colored fondant around rice krispies. Even the polka dots and strips along the side of the cake are pieces of cutout fondant. After adding these final decorations, roll out yellow fondant for the fence around the outside of the cake.
Congratulations on creating a detailed Mickey Mouse clubhouse cake and it is time to enjoy all of your hard work.
