Spider Web Cake
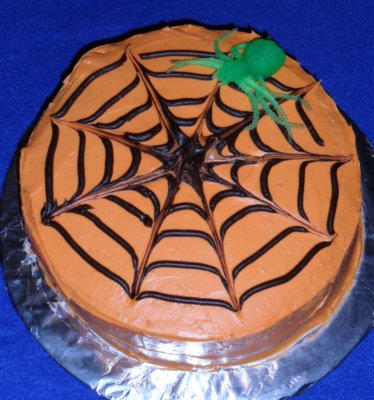 |
This is a simple spider web cake that would be perfect for a Halloween party cake, a Charlotte’s Web party cake or for a Spiderman party cake. I was intrigued with the pull design that you can make on cookies and thought that it would be interesting to see how it would work on a cake. At times I feel like these designs on cookies and in artwork looks like spider webs which was the inspiration for this cake. I decided to try to make this cake round because I was inspired by a cookie design. I decided to make a yellow cake. Being that this cake was going to be enjoyed around halloween and there would be lots of candy to be eaten on the side of the cake. |

This is a simple spider web cake that would be perfect for a Halloween party cake, a Charlotte’s Web party cake or for a Spiderman party cake. I was intrigued with the pull design that you can make on cookies and thought that it would be interesting to see how it would work on a cake. At times I feel like these designs on cookies and in artwork looks like spider webs which was the inspiration for this cake.
I decided to try to make this cake round because I was inspired by a cookie design. I decided to make a yellow cake. Being that this cake was going to be enjoyed around halloween and there would be lots of candy to be eaten on the side of the cake.
How to Make the Ultimate Spider Web Cake
I baked two cakes in two eight inch cake pans. To help with the removal of the cake I traced with open scissors the cake pans on parchment paper. I then cut out the circle shapes to put in the bottom of the cake pans. To hold the parchment paper at the bottom of the pan I sprayed a small dot of cooking spray at the bottom of the pan. This helps to hold it in place. I then sprayed the outside sides of the pan. Then I put the batter into the pan.
I baked the cake at 350 degrees for about 30 or 35 minutes. I then let the cake cool for about 10 minutes. I then popped the cakes out and let them cool completely on a cooling rack. Once the cakes are completely cooled I then leveled the cakes. I used my cake leveler. I set it beside and measure to see how high I can make it. It has solid sides and then a thin metal knife that is attached across the cake area. For the excess cake I placed it into a container to later make cake pops.
I put the cake on a silver cake tray. It was a generic size and purchased at our bulk food store. If you are wanting to make your own, you can easily do this by finding a thick piece of cardboard. If you want it to match the shape of the cake tray, flip the cake pan over and trace it. Then find a sharp pair of scissors and cut the cardboard to the shape. Then you get a large enough piece of tinfoil to cover the cardboard. Next I cut small incisions into the tinfoil. Then fold the tinfoil in to be tight with the cardboard. After this you need to tape the tinfoil down on the backside of the cardboard. Finally it is ready to have the cake set on top and it will be ready to be decorated.
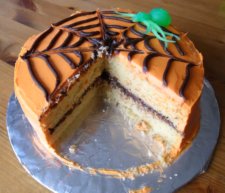
In the center I put a layer of chocolate icing. This then forms the cake to being a tall two tiered cake.
For the outside of the cake I made orange icing from vanilla icing. I used the Wilton orange food coloring. I mixed the icing together in a small bowl. I then iced the cake the solid color of orange. I used an angled spatula. I had the cake on my cake spinner. It makes it quick to ice a cake. I lightly am constantly spinning the cake while resting the spatula on the cake. I find it makes it so that the icing is the same thickness all the way around.
Next, I filled an icing bag with chocolate icing. These are the triangle bags. I have a white cap that goes in it and then I am able to interchange the different decorating tips. To hold the tips in place there then is a white cap that screws into the white cap on the inside.
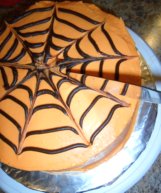
Using the decorating tip number 9, I made a coin sized circle in the middle of the cake.
Then I made some regular larger circles that went around the cake. I put five rings on the cake. Finally I used a soft spatula and dragged it through the icing. This made the icing look like a spider web. I was surprised how easy this technique was for how good the cake looked. I then placed a toy spider on the top of the cake.
 |
 |
 |


I used orange icing, but I think that it would also have looked great with blue, green or purple icing. I often think of purple when thinking about halloween. If this was more of a tween party I could see this design being used on a hot pink cake with black streaks.
Best of luck making your very own spider web cake. I think this cake would look amazing beside a stand alone large cake of a spider. I think if I could make a spider cake I would make it with fondant. We would love to see your designs and hear all about your designs.
