Tiara Cake
|
Oh, just think about how pretty it would be to have a tiara cake at your next special event. Now, you can have a delicious cake, a great decoration, and a focal point of sweets and treats all in one! When people are little, many dream of one day becoming a prince or princess. Check out these two cakes as inspiration for creating your own. Click on the image to learn more. |
Oh, just think about how pretty it would be to have a tiara cake at your next special event. Now, you can have a delicious cake, a great decoration, and a focal point of sweets and treats all in one! When people are little, many dream of one day becoming a prince or princess. Check out these two cakes as inspiration for creating your own. Click on the image to learn more.
Crown Cake
 |
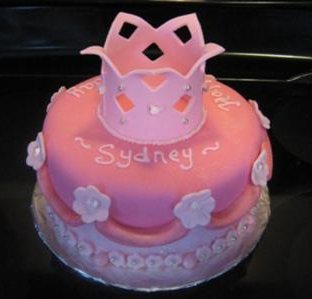
This cake was submitted by Kathy from London, Ontario. She said this cake was for someone “who loves all things pink and sparkly”. This chocolate cake is cute with all the pink fondant, edible glitter, pearl dust, and sugar diamonds. To make this cake, begin by preheating the oven and grease two 9 inch cake pans with cooking spray. Then, cut out two pieces of parchment paper to place at the bottom of the pan. A tip for measuring parchment paper is to place the pan on the parchment paper and trace around the pan, which allows for the exact size needed. |
This cake was submitted by Kathy from London, Ontario. She said this cake was for someone “who loves all things pink and sparkly”. This chocolate cake is cute with all the pink fondant, edible glitter, pearl dust, and sugar diamonds.

To make this cake, begin by preheating the oven and grease two 9 inch cake pans with cooking spray. Then, cut out two pieces of parchment paper to place at the bottom of the pan. A tip for measuring parchment paper is to place the pan on the parchment paper and trace around the pan, which allows for the exact size needed.
While the oven is heating, thoroughly mix together chocolate cake batter. Then, pour half of the batter into each of the pans. Once the cakes are completely cooked, place on a baking sheet to cool.
When both cakes are completely cooled, place one onto a serving tray. Then, apply a thin layer of icing and stack the second chocolate cake on top. Next, apply a crumb coat (thin layer) of icing on the cakes. Now the cakes are prepped and ready for the fondant.
You will need bright pink and light pink fondant for this cake, either homemade or bought directly from the store. Either way, knead the fondant, making sure the fondant is a soft, play-do like texture. Roll out a large piece of bright pink fondant that will cover the entirety of the cakes. Then, using a straight edge fondant smoother, gently smooth out the edges and cut off the excess. After, roll out a light pink piece of fondant and measure and cut out a rectangle that will cover the bottom half of the cake.
Now, it is time to cut out and create the flower decorations for the cake. Roll of a piece of light pink fondant and use a small flower cookie cutter for the bottom fondant flowers. In the center of each fondant flower place a small sugar diamond in the place of pollen. Every four flowers, place a light pink candy, gently pressing it into the fondant to prevent it from rolling away. Then, roll out the snake-like rope shape of the bright pink fondant and using some water as adhesive press it onto the cake, flattening the top of each swoop. By using the same technique as the small flowers, cut out slightly larger light pink flowers and place them on top of each bright pink rope swoop.
To make one of the most prominent fondant decorations of this cake, roll out a large piece of bright pink fondant. Then, trace out and pre-cut the shape of the crown and use adhesive to make it three dimensional. On the cake, pipe a thin line of pink icing and then place the crown on top. Using the same piping bag and pink icing, write out a happy birthday message for the guest of honor. Finally, add some sparkly touches all over the cake with edible glitter and pearl dust.
It is time to enjoy your chocolate crown cake with pink fondant decorations and final sparkle touches. Shout out to Kathy for submitting this pretty cake.
Tiara Cake
 |
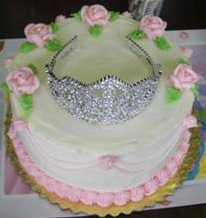
This pretty tiara cake was submitted by Monique for her daughter’s 4th birthday party. The neat thing about this cake is that the birthday girl gets the fancy tiara. This is a fun surprise, as once the candles are blown out the guest of honor gets to wear the tiara while eating the cake. To make this cake, begin by baking two 9 inch vanilla cakes. Once fully cooked (when poked, a toothpick comes out clean), set the cakes aside to cool. During this time, mix together white vanilla icing, pink and green icing. Place one of the cakes onto a serving tray and apply a thin layer of vanilla icing and place the second cake on top. Then, apply a thick layer of vanilla icing and smooth it out using an icing spatula. |
This pretty tiara cake was submitted by Monique for her daughter’s 4th birthday party. The neat thing about this cake is that the birthday girl gets the fancy tiara. This is a fun surprise, as once the candles are blown out the guest of honor gets to wear the tiara while eating the cake.

To make this cake, begin by baking two 9 inch vanilla cakes. Once fully cooked (when poked, a toothpick comes out clean), set the cakes aside to cool. During this time, mix together white vanilla icing, pink and green icing. Place one of the cakes onto a serving tray and apply a thin layer of vanilla icing and place the second cake on top. Then, apply a thick layer of vanilla icing and smooth it out using an icing spatula.
Now it is time to add the colorful icing decorations. Using a #32 icing tip, ice pink swirls as a border around the bottom of the cake. Then, with the same cake tip, pipe six pink icing spots, evenly spaced around the middle of the cake. Next, using a #5 cake tip, create two rows of pink icing swoops between each icing spot. To make the icing flowers hold a piping nail with a piece of parchment paper placed on top (held in place with a small dot of icing) in one hand and piping icing with a #104 tip in the other. Begin piping the flower with the thicker side of the tip at the bottom and placing it flat, pipe a petal shape, which will be against the parchment paper. Then, continue to pipe petal shapes until your flower is complete. Next, place the pieces of parchment paper into the freezer for a while. Then, remove from the parchment and place on the cake. After all the flowers are in place, use a #326 tip to pipe some small leaves around the flowers. Finish the cake by gently placing a tiara on top for the guest of honor.
Now your tiara cake is finished and ready to be enjoyed. Special thanks to Monique for submitting this fun cake and tiara idea.

